When attempting to run 1000 miles, we soon noticed that it *could* draw to its windows, but it didn’t because we didn’t send update events to the application. As Window Manager implementation had already added foundation for posting the update events, we added support for it in the EventAvail/GetNextEvent, and stuff started happening.
After adding BeginUpdate, EndUpdate, and a bunch of other traps 1000 miles needed, such as PlotIcon and Pack7 (DecStr68K) package (for NumToString through LBin2Dec), we got nice looking interface of the game visible:
Update Events working; 1000 miles windows have now content
After the recent changes, we decided to try out another classic game, Tetris:
The sound was not yet working correctly, but at least the title screen appeared correctly. As the game wanted to use ScrollRect to scroll text in the small box at bottom, this gave us a good excuse to go on and implement it:
Now with Window Manager traps starting to get implemented, we could start work on the Dialog Manager. Technically, dialogs depend a lot on the Window Manager, as every dialog is a window, which contains extra information to track dialog items in it. After adding support for static text dialog items, we were able to display the intro dialog of one of our favourite games:
After some work on the virtual MBDF code resource, and related Menu Manager routines, we now have menu titles visible on the menu bar:
The menu titles are for the first time visible on the menu bar
For testing purposes, we also switched the desktop pattern by adjusting the ‘PAT ‘ 16 resource.
Window Manager
At this point, we wanted to get work done on the actual Window Manager routines, so we chose a few of the most simple applications we had for guiding our development and testing the results. One of them was the really old “3-D Maze” app by Mark Frohnmayer. Having the Pascal source code for it, it was quite easy to trace what the 68K code in it was attempting to do, so we could handle any issues we encountered. As this application is not a full game, but rather a demonstration for a Dungeon Keeper/Wizardry style engine, it consisted mostly of DrawPicture and CopyBits calls into a window.
Even the first GetNewWindow call had a lot of dependencies to other Window Manager traps (not to mention the ShowWindow and SelectWindow later!), but we got soon the first window displayed on the screen:
The first ever window, with picture drawn into it by the 68K test app
As we focused on the actual Window Manager implementation, we left the default WDEF for now as a simple one-pixel frame (and added for testing regions a small drop shadow), the windows look quite plain at the moment, but that should be enough to get applications run further.
1000 miles creates a lot of windows!
We also tested the new Window Manager routines with another app, 1000 miles, which was quite interesting because unlike most applications, which usually have one or a few windows, it had literally a window for every possible part of it’s user interface.
As one of the main goals is to actually run our favorite games in this emulator, we started now converting some of them into the AppleDouble format, and one of the was the legandary Dark Castle by Silicon Beach Software. It almost worked:
Well, theres something there…but not quite right yet
After fixing a bunch of bugs, and adding another bunch of new traps, it actually didn’t take long to get the title screen to appear. However, GetNextEvent was unimplemented at this point, so couldn’t yet proceed past it, and also the animation timing appears to still a bit off. It was nice though to see that the alternate video page switching code appears to work nicely, including also for the first time having 68K code running in VBL service thread! The video below shows this running:
Now that the test application is passing its runtime startup, it’s attempting to initialize various Toolbox managers, which of course gives us a good excuse to start work on the Menu and Window Managers, beginning from InitWindows.
The menu bar and desktop are some of the most iconic parts of the Mac user interface, and as these initialization routines set up these, we have something that is finally stating to look like a real Mac desktop. Another benefit of having file system at this point is that we can actually read the desktop pattern from ‘PAT ‘ resource ID 16 (using new GetPattern trap) from System file, like a real Mac does, and use that to paint the desktop.
First appearance of the menu bar
Another interesting new feature was the support of virtual code resources read from the System file, using a customized mixed-mode loading mechanism which allows inserting UPP record for a native C code resource, such as in this case MBDF, into the MBDF resource read from the System file – which in this case was used to draw the menu bar!
Now with the first application, a lot of work has been going into fixing the CPU bugs, and implementing missing toolbox APIs one by one as required by the test application. In middle of this though, we added one feature which is quite important to a graphical system: Mouse support.
There’s not much to tell about this new feature, as technically the implementation is pretty trivial, with mouse hardware abstraction and new mouse low mem globals.
Hopefully we can soon use the mouse support for something cool.
A simple mouse input test in the testbed. This test prints the coordinates and button state at mouse location, with text inverted when button is held down.
Thanks to the earlier work done on Resource Manager for the “Fake” ROM resources, we already had rudimentary support for accessing resources. As the ROZ resource map was built to have exactly same format like “real” resource maps, the main missing features needed were reading and loading the resource map from resource fork using the recently added File Manager traps, and implementing further file reading operations in LoadResource trap.
Segment Loader
And now with ability to load resources, the first thing to logically do is to start work on the Segment Loader. The Launch trap is used to:
Handle launch parameters
Init application one (unless doing a “Chain” launch)
Load jump table from CODE resource ID 0
Set up the A5 world and copy jump table to correct place
Set up 68K state
Jump to application entry point in 68K code
At this point, we can now for the first time start running an actual 68K Mac application, although there were, and still are, a bunch of 68K cpu bugs to fix. At least, now we can test the CPU emulator with actual, real program code!
Resource map dump of the first actual Mac test application
After a short one-month break, and with Device Manager now working, we were finally able to start implementation of the virtual file system, dubbed NativeFS at this point. We use the virtual “.NativeFS” DRVR to mount the file system, which we for now install as ExtFS hook for File Manager. This way, we can make the file system appear as a foreign file system similar to AppleShare for Mac apps, increasing compatibility with apps which can handle those file systems correctly. Also, we can later add real MFS/HFS support to the actual File Manager level if we want.
We also abstracted the native file system layer in such a way, that we are not bound by a single storage solution, but have a native file system backend which we can change if needed, without needing to rebuild the entire NativeFS layer. After long and careful consideration, we decided to use AppleDouble as the first implementation, as it provided the best features for our requirements. Initially, we were thinking about using MacBinary (similar to AppleSingle), which would have made transferring files easier, but would have had much higher overhead in write operations, as having data and resource forks combined in a single file would have required moving the other fork back and forth when changing size of the fork preceding the other one in the file. On Mac OS X, we could have used the real HFS (recently APFS) metadata for catalog information and resource forks, but this way we have immediately support for running applications on other platforms. The file naming convention we used follows the UNIX convention documented by apple in the AppleSingle/AppleDouble Formats for Foreign Files Developer’s Note.
A partial listing of AppleDouble files in the virtual volume folder, with some of the metadata shown
File Manager
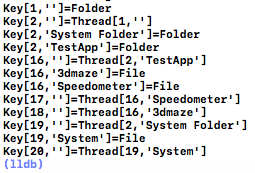
To make interfacing with File Manager easier in the long run, we decided to organize the files in memory as a tree structure, which has similar search properties as real HFS B-trees. This means, that we use CNID-Filename pair as catalog key, and include thread records to map CNIDs to file/folder records. Main difference compared to real HFS that instead of B-trees, which are optimized for on-disk storage, we use AVL-tree (which at the time of writing this is implemented just as a simple unbalanced binary tree)
Console debug dump of the binary tree containing files on virtual volume
The NativeFS to File Manager ExtFS bridge was inspired by Apple’s FSM (File System Manager) documentation, which detailed how to use FSM to implement path resolving and generally handling various File Manager calls, which actually matched quite closely to the ExtFS interface.
First file read
After a few weeks of hard coding, we finally got file reading to work, and did the first successful file read test, in which we fetched the data fork contents of a file on the virtual volume using newline mode.
The past few weeks turned out rather interesting. After getting the basic Device Manager API written, we needed to have some simple test case to try it out – and as mentioned in the previous post, Sound Driver was an interesting potential use case. So that’s what we did…
The “Classic Mac” sound hardware
To get sound output abstracted in the emulator, we needed a bunch of stuff to support it, which includes:
Host platform abstraction for sound device: This allows us to create a SDL output buffer, and handle transfer to sound data from emulator to the host.
Hardware abstraction for sound: This separates “Classic Mac” type sound from future “Sound Manager” type generic audio output, and also ties the “Classic Mac” VIA to the audio output to control square wave generator, volume, alternative sound buffer, etc.
Vertical retrace simulation: More about this below
And also the Sound Driver DRVR
Vertical retrace interrupt simulation
One challenge in the old “Classic Mac” type computers is, that the sound output is deeply tied into the video signal generation, and especially the timings depend a lot on the frequency this generator works. In attempt to match this hardware as closely as possible, we added a secondary thread to simulate vertical retrace interrupts. As some might know, simulating hardware interrupts using threads is very tricky: On real hardware, interrupts are non-preemptive (except when allowed by the status register, as VBL interrupt handler does to keep Ticks low-mem variable in sync), but on multithreading system main thread could at any time pre-empt the interrupt thread.
To prevent this, we devised a locking scheme, which attempts to ensure that the interrupt service never gets cut off by main thread. At this moment it’s not a problem, as there is not yet actual 68K code running on main thread, but that we need to prepare for that in future, especially when VBL service routines written in 68K code might interrupt 68K code running on main thread!
In any way, the interrupt simulator currently reads the full sound buffer on each simulated VBL interrupt, and outputs the result through the hardware abstraction layer. The biggest challenge here at moment is keeping the SDL’s audio thread and VBL thread in sync, as the frequency of SDL sound output needs to match *exactly* the rate at which VBL thread is providing the sound data. It appears to be quite OK at the moment though, with occasional minor ticks here and there – currently the biggest source of breaks in audio appears to actually be the Xcode debug console, which seems to not be very thread-friendly…
Square-wave generator test
One neat feature of “Classic Mac” sound hardware is the built-in square-wave generator. Absent from later macs, this feature was very practical way of generating sound output without using almost any CPU resources. Controlled by the VIA, it was the first sound feature we implemented:
A simple square-wave sound test (sorry for low volume)
The Sound Driver
With sound hardware emulation in place, we could finally implement the Sound Driver. It took a day to decipher the old “.Sound” DRVR code, but after understanding how it works, we were able to whip up a C implementation which has equivalent functionality. In the process, we finalized an initial implementation for Vertical Retrace Manager.
Examining the original .Sound driver
After adding four-tone support, we needed a way to test this, so we wrote a test song by hard-coding it in C-language using set of frequencies as described in Inside Macintosh II-237 “Sound Driver” chapter, and used FTSynthRec to feed them to the virtual “.Sound” DRVR combined with a custom VBL task:


You must be logged in to post a comment.